Using Nuxt-auth-utils to implement a magic link login
Hakanai has just been released, it's a SAAS I've been building over the last couple of weeks that lets you send a newsletter based on an RSS feed. It's obviously the tool I use for this blog's newsletter ;)
And of course, SAAS means login screen. I'm not going to lie to you, it's rarely the most pleasant part to do. I've already made hundreds of login screens, and it's more time-consuming than interesting.
So obviously I wanted to find a bookshop that would do everything for me.
I even looked at Supabase or Clerk, but I chose to keep control of my user base and not use these services.
Are you interested in the details of the complete stack? I talked about it in a previous post.
Anyway, for this SAAS, I chose to use nuxt-auth-utils, written by Sébastien Chopin who is quite simply the CEO of NuxtLabs, the company that publishes the Nuxt Framework.
the magic link login
Here's the login form in question:

which, by the way, is slightly different from the signup form, because a user signup must always recall the value of the product. But that's another subject.

You'll note that I only offer two choices:
- a social signup/login via Google
- a signup/login by email, without password!
The second mode is what's known as a magic link login.
A magic link is simply a link you receive in your e-mail inbox, enabling you to connect to an application.
It's an option that eliminates the need for a password. It's also known as passwordless authentication.
I won't go into the details, but it's widely used today, for example on medium, supabase, clerk, microsoft live and so on.
The big advantage I see is that I don't want to manage user passwords. I don't want to code all the necessary functionalities linked to password management: password reset, modification etc...
And above all, I don't want to be responsible for your password, its reliability, its renewal, the way you secure it etc...
In short, I've chosen to have only the social login and the magic link login.
Now, Nuxt-auth-utils is used to manage social logins. So you're going to need a bit of elbow grease to manage this one.
Sending the magic link
Here's a very basic login form for Nuxt :
<template>
<form ref="sendMagicLinkForm">
    <label for="email">Enter the email address associated with your account, and we'll send a magic link to your inbox.</label>
    <input
        v-model="email"
        type="email"
        name="email"
        placeholder="youremail@test.com"
        required=""
    >
    <button type="submit" @click.prevent="sendMagicLink">
            Sign in
    </button>
</form>
</template>
The user must enter their email, then click on the button that triggers sendMagicLink.
The sendMagicLink function simply sends the email to the server, which will then send it to the user.
const sendMagicLinkForm = ref<HTMLFormElement | null>(null)
const email = ref('')

async function sendMagicLink() {

    if (!sendMagicLinkForm.value?.checkValidity()) {
        sendMagicLinkForm.value?.reportValidity()
    }

    try {
        await $fetch('/api/auth/signin/magic-link', {
            method: 'POST',
            headers: {
                'Content-Type': 'application/json'
            },
            body: {
                email: email.value,
            }
        })
    } catch (error) {
        consola.error(error)
    }
}
Here, you can use a server route on the Nuxt side. I use Spring Boot and Kotlin. But it's easy enough to transpose to another language.
Here's the method that will send an email with the magic link
    @PostMapping("/api/account/signin/magic-link")
    fun signinViaMagicLink(email: String): ResponseEntity<Void> {
        val account = sendMagicLink(email)

        return ResponseEntity.ok().build()
    }

    fun sendMagicLink(email: String): Account {
        val account = accountRepository.findByEmail(email) ?: throw BadParameterException("Account not found")
        val magicLink = createMagicLink(account.id!!)
        val emailBody = emailContentBuilder.getMagicLinkContent(magicLink)
        emailSender.sendMagicLinkEmail(email, "Signin to Hakanai", emailBody)
        return account
    }
The email sending code is not the most important thing.
The creation of the magic link itself can use UUID mechanisms. What is important, however, is to ensure that the magic link is valid for no more than x minutes. You can use a TTL if the database allows it, or simply check the link creation date before validating it.
Because yes, it's not over yet. We now need to validate the link AND create the user session.
Magic link validation
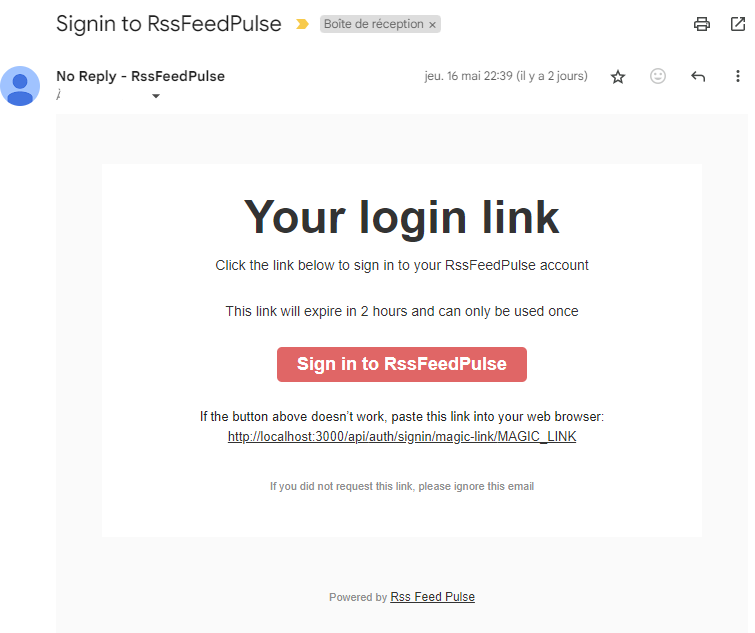
The user will receive an email with this link:

At this stage, the user can click on the link, which will send him/her to the site, authenticated.
Validating the magic link on the Kotlin side is relatively straightforward: here we compare the two tokens, the one in the database and the one on the link. Note that the link is also deleted once it has been used. A link can only be used once.
    @PostMapping("/api/account/signin/magic-link/verify")
    fun confirmSigninViaMagicLink(token: String): ResponseEntity<Void> {
        val account = magicLinkService.verifyMagicLink(token)
        return ResponseEntity.ok().build()
    }
    @Transactional
    fun verifyMagicLink(token: String): Account {
        val magicLink = magicLinkRepository.findByToken(token) ?: throw BadParameterException("Magic link not found")
        val since = LocalDateTime.now().minusHours(2)
        if (magicLink.expirationDate.isBefore(since)) {
            throw BadParameterException("Magic link expired")
        }
        accountRepository.findById(magicLink.account.id!!).orElseThrow { BadParameterException("Account not here anymore") }
        magicLinkRepository.deleteByToken(token)
        return magicLink.account
    }
But now we need to create the user session.
Creating the user session
In reality, the email link doesn't go directly to the kotlin server, so this time we'll use a Nuxt server route
Here's what it looks like:
export default defineEventHandler(async (event) => {

    try {
        const token = getRouterParam(event, 'token') as string
        await confirmSigninFromSigninLink(event, token)
        return sendRedirect(event, '/campaigns')
    } catch (error: any) {
        throw await errorManager(error, true)
    }
})
async function confirmSigninFromSigninLink(event: H3Event, token: string): Promise<AccountDTO> {
    try {
        // call to the kotlin backend
        const account = await api.confirmSigninViaMagicLink({token})
        await setUserSession(event, {
            user: {
                login: account.name,
                email: account.email,
                loggedInAt: new Date().toISOString(),
            },
        })
        return account
    } catch (error: any) {
        throw await errorManager(error, false)
    }
}
Two things are extremely important to understand here:
- the use of setUserSession to modify our user's current session
- returning the client-side session with the redirect
sendRedirect(event, '/campaigns').
At this stage, the link has been consumed and the user redirected, with a valid session.
That's all for today. I hope this little tutorial has helped you understand how to implement a magic link login with Nuxt-auth-utils.


